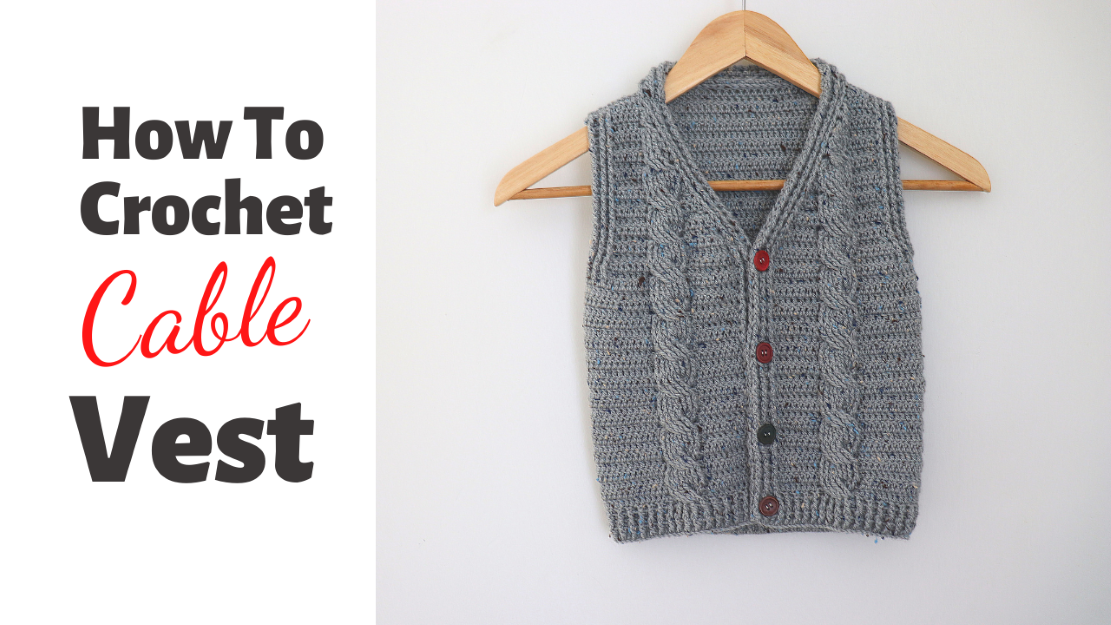
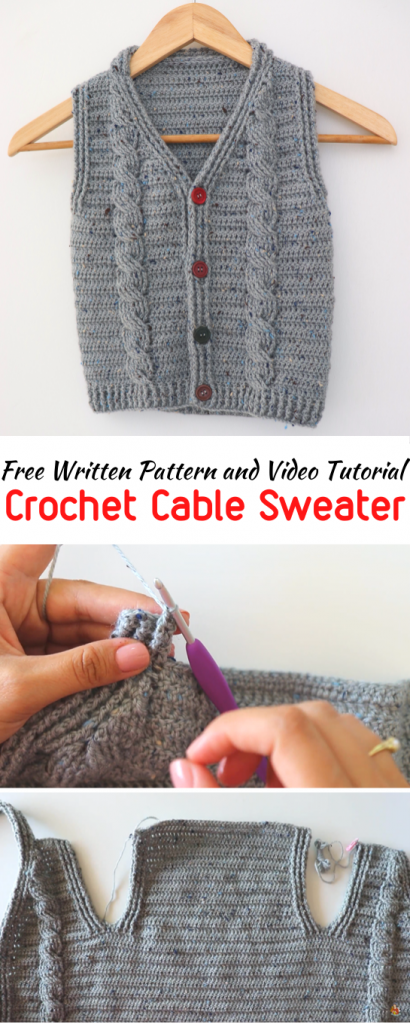
Learn how to crochet a cable sweater with buttons! Cables can seem scary but be sure there isn’t too much math. No need for too much effort. It’s really easy pattern to work with! I hope you enjoy..
- You can purchase the ad-free PDF versions of my patterns on Etsy.
- You can print the PDF’s and use them anywhere you want. This way you can also support my works too.
MATERIALS
Yarn
- Life Dk by Stylecraft (light worsted, category 3) 2Balls
4 Buttons
4 mm Crochet Hook
Yarn Needle
Scissors
STITCHES & ABBREVIATIONS
Ch = Chain
St(s) = Stitch(es)
Sl St = Slip Stitch
Sk = Skip
HDC = Half Double Crochet
DC = Double Crochet
FpDC = Front Post Double Crochet
BpDC = Back Post Double Crochet
FpTr = Front Post Treble Crochet
DC2tog = Double Crochet 2 Together
FpDC2tog = Front Post Double Crochet 2 Together
BpDC2tog = Back Post Double Crochet 2 Together
FpTr2tog = Front Post Treble Crochet 2 Together
NOTES:
*Sample is for 4-5 yrs old.
*US crochet terms are used in this pattern.
*’DC 10′ means DC into the next 10 stitches.
*The turning chain ch 2 does NOT count as a DC.
*Repeat instructions between asterisks (**) as many times as directed.
*Pattern is adjustable for any sizes. You can search the chest measurements on the internet. According to that measurement, you can make that long chain base(make sure that you end on with an odd number) and work on it.
*This pattern is based on cable stitch. To create the cable stitch, skip 4 stitches and FpTr into the next 4 stitches, place 1 FpTr in each of the 4 skipped stitches. See the pictures:


FOUNDATION CHAIN: Ch 133 (62cm).
ROW 1: DC in 4th ch from hook, DC to end, turn. (131 sts in total)
ROW 2: Ch 2, *BpDC, FpDC, repeat from * until 2 sts left, BpDC, HDC, turn.
ROW 3: Ch 2, *FpDC, BpDC, repeat from * until 2 sts left, FpDC, HDC, turn.
ROW 4: Repeat row 2.
ROW 5: Ch 2, *FpDC, BpDC*2, FpDC, DC 8, BpDC, sk 4 sts, around next 4 sts FpTr 4, turn back to that 1st st of 4 sts skipped FpTr 4, BpDC, DC until 24 sts left, BpDC, sk 4, FpTr 4, turn back to the 1st st of 4 sts skipped FpTr4, BpDC, DC 8, *FpDC, BpDC*2, FpDC, HDC, turn.
ROW 6: Ch 2, *BpDC, FpDC*2, BpDC, DC 8, FpDC, BpDC 8, FpDC, DC in each st until 24 sts left, FpDC, BpDC 8, FpDC, DC 8, *BpDC, FpDC*2, BpDC, HDC, turn.
ROW 7: Ch 2, *FpDC, BpDC*2, FpDC, DC 8, BpDC, FpDC 8, BpDC, DC in each st until 24 sts left, BpDC, FpDC 8, BpDC, DC 8, *FpDC, BpDC*2, FpDC, HDC, turn.
ROW 8: Repeat row 6.
ROW 9-28: Repeat rows 5-8. Do not fasten off. Proceed directly to Front Panel-1 instructions.
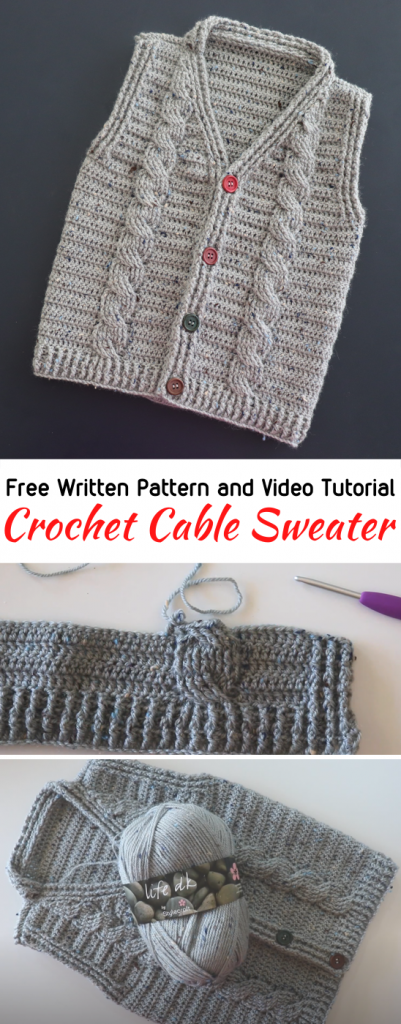
*To make the armhole separation, count fourteen stitches starting from the right side of the cable stitch of right panel and the left side of the cable stitch of left panel and insert stitch markers into the fourteenth stitches of both sides as seen in the picture below. (the first stitches are BpDCs)

FRONT PANEL-1
*Keep working on the body.
ROW 29: Ch 2, *FpDC, BpDC*2, FpDC, DC 8, BpDC, sk 4, FpTr 4, turn back to 4 sts sk, FpTr 4, BpDC, DC 7, *FpDC, BpDC*2, FpDC, HDC, turn.
ROW 30: Ch 2, *BpDC, FpDC*2, BpDC, DC2tog, DC 5, FpDC, BpDC 8, FpDC, DC8, *BpDC, FpDC*2, BpDC, HDC, turn.
ROW 31: Ch 2, *FpDC, BpDC*2, FpDC, DC2tog, DC 6, BpDC, FpDC 8, BpDC, DC 4, DC2tog, *FpDC, BpDC*2, FpDC, HDC, turn.
*After row 31, decreases will only be on the neckline.
ROW 32: Ch 2, *BpDC, FpDC*2, BpDC, DC 5, FpDC, BpDC 8, FpDC, DC 5, DC2tog, *BpDC, FpDC*2, BpDC, HDC, turn.
ROW 33: Ch 2, *FpDC, BpDC*2, FpDC, DC2tog, DC 4, BpDC, sk 4, FpTr 4, turn back, FpTr 4, BpDC, DC 5, *FpDC, BpDC*2, FpDC, HDC, turn.
ROW 34: Ch 2, *BpDC, FpDC*2, BpDC, DC 5, FpDC, BpDC 8, FpDC, DC 3, DC2tog, *BpDC, FpDC*2, BpDC, HDC, turn.
ROW 35: Ch 2, *FpDC, BpDC*2, FpDC, DC2tog, DC 2, BpDC, FpDC 8, BpDC, DC 5, *FpDC,BpDC*2, FpDC, HDC, turn.
ROW 36: Ch 2, *BpDC, FpDC*2, BpDC, DC 5, FpDC, BpDC 8, FpDC, DC, DC2tog, *BpDC,FpDC*2, BpDC, HDC, turn.
ROW 37: Ch 2, *FpDC, BpDC*2, FpDC, DC2tog, BpDC, sk 4, FpTr 4, turn back, FpTr 4, BpDC, DC 5, *FpDC, BpDC*2, FpDC, HDC, turn.
ROW 38: Ch 2, *BpDC, FpDC*2, BpDC, DC 5, FpDC, BpDC 8, DC2tog, *BpDC, FpDC*2, BpDC, HDC, turn.
ROW 39: Ch 2, *FpDC,BpDC*2, FpDC, sk 1, FpDC 8, BpDC, DC 5, *FpDC, BpDC*2, FpDC, HDC, turn.
ROW 40: Ch 2, *BpDC, FpDC*2, BpDC, DC 5, FpDC, BpDC 6, BpDC2tog, *BpDC, FpDC*2, BpDC, HDC, turn.
ROW 41: Ch 2, *FpDC, BpDC*2, FpDC, sk 3, FpTr2tog, FpTr 2, turn back, FpTr 3, BpDC, DC 5, *FpDC, BpDC*2, FpDC, HDC, turn.
ROW 42: Ch 2, *BpDC, FpDC*2, BpDC, DC 5, BpDC 4, BpDC2tog, *BpDC, FpDC*2, BpDC, HDC, turn.
ROW 43: Ch 2, *FpDC, BpDC*2, FpDC, FpDC2tog, FpDC 3, DC 5, *FpDC, BpDC*2, FpDC, HDC, turn.
ROW 44: Ch 2, *BpDC, FpDC*2, BpDC, DC 5, BpDC 2, BpDC2tog, *BpDC,FpDC*2, BpDC, HDC, turn.
ROW 45: Ch 2, *FpDC, BpDC*2, FpDC, sk 1 st, FpDC2tog, turn back to skipped st FpDC, BpDC, DC5, *FpDC, BpDC*2, FpDC, HDC,turn.
ROW 46: Ch 2, *BpDC, FpDC*2, BpDC, DC 5, BpDC2tog, *BpDC, FpDC*2, BpDC, HDC, turn.
ROW 47: Ch 2, *FpDC, BpDC*2, FpDC, sk decreased st from previous row, BpDC, DC 5, *FpDC, BpDC*2, FpDC, HDC. Leave a bit long tail, cut the yarn, put a marker to the last stitch. Do not fasten off.
FRONT PANEL-2
*Insert your hook into stitch with stitch marker. Secure yarn and pull up a loop.
ROW 29: Ch 2, *FpDC, BpDC*2, FpDC, DC 7, BpDC, sk 4, FpTr 4, turn back, FpTr 4, Bp, DC 8, *FpDC, BpDC*, FpDC, HDC, turn.
ROW 30: Ch 2, *BpDC, FpDC*2, BpDC, DC 8, FpDC, BpDC 8, FpDC, DC 5, DC2tog, *BpDC, FpDC*2, BpDC, HDC, turn.
ROW 31: Ch 2, *FpDC, BpDC*2, FpDC, DC2tog (last decrease for the armhole), DC 4, BpDC, FpDC 8, BpDC, DC 6, DC2tog, *FpDC, BpDC*2, FpDC, HDC, turn.
ROW 32: Ch 2, *BpDC, FpDC*2, BpDC, DC2tog, DC 5, FpDC, BpDC 8, FpDC, DC 5, *BpDC, FpDC*2, BpDC, HDC, turn.
*Repeat these rows with only neckline decreases, until you have the same amount of rows(47 rows in total) as your other front panel.
ROW 48: Ch 2, *BpDC, FpDC*2, BpDC, HDC, turn.
ROW 49: Ch 2, *FpDC, BpDC*2, FpDC, HDC, turn.
*Repeat rows 48 and 49 for the ribbing, until you have 31 rows in total. Leave a bit tail, cut the yarn. Do not fasten off.

BACK PANEL
*Insert your hook right next to where you place the stitch marker for the first panel. Secure yarn and pull up a loop.
ROW 29: Ch 2, *FpDC, BpDC*2, FpDC, DC in each st until 6 sts left, *FpDC,BpDC*2, FpDC, HDC, turn.
ROW 30: Ch 2, *BpDC, FpDC*2, BpDC, DC2tog, DC in each st until 2 sts left before the ribbing, DC2tog, *BpDC, FpDC*2, BpDC, HDC, turn.
ROW 31: Ch 2, *FpDC, BpDC*2, FpDC, DC2tog, DC in each st until 2 sts left before the ribbing, DC2tog, *FpDC, BpDC*2, FpDC, HDC, turn. (last decrease row)
ROW 32: Ch 2, *BpDC, FpDC*2, BpDC, DC in each st until ribbing, *BpDC, FpDC*2, BpDC, HDC, turn.
ROW 33: Ch 2, *FpDC, BpDC*2, FpDC, DC in each st until ribbing, *FpDC, BpDC*2, FpDC, HDC, turn.
*Repeat rows 32 and 33 until row 47. Do not fasten off.


ASSEMBLY
Work from the wrong side. Hold the back and front panel-1 together and the right sides facing each other. Line up the stitches. Ch 1, insert your hook into very first stitches(work on the both loops of each stitch), grab the yarn, pull the yarn up through the loops to form the sl st. Sl st across until 7 sts left(do not fasten off). Leave it, continue on the back side and the front panel-2.


Start as we did before, sl st across until the ribbing. Now, we are going to attach the ribbing to the back panel. Insert into the stitch and insert into the ribbing row, make a sl st. Keep crocheting sl sts until ribbing we left before. Join two ends of ribbings together. Close the gaps. Cut the yarn. Weave in all of your ends.


Sew the buttons. You don’t need to make button holes since there are gaps in ribbing. Done!

Pattern created by Sirin’s Crochet
Written by Ece Bektas (@ecelibuculu)
Copyright: This pattern is copyrighted by Sirin’s Crochet and may not be copied, sold, distributed and claimed as yours. You are more than welcomed to share and sell your makes using this pattern. Please give credit to Sirin’s Crochet.
Please feel free to visit my Youtube channel at Sirin’s Crochet for more free video tutorials and don’t forget to subscribe to be notified for more free patterns.
- Video Tutorial:

