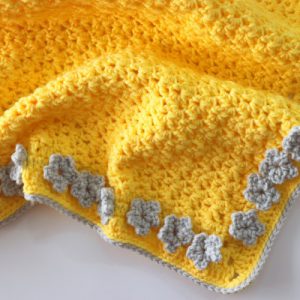
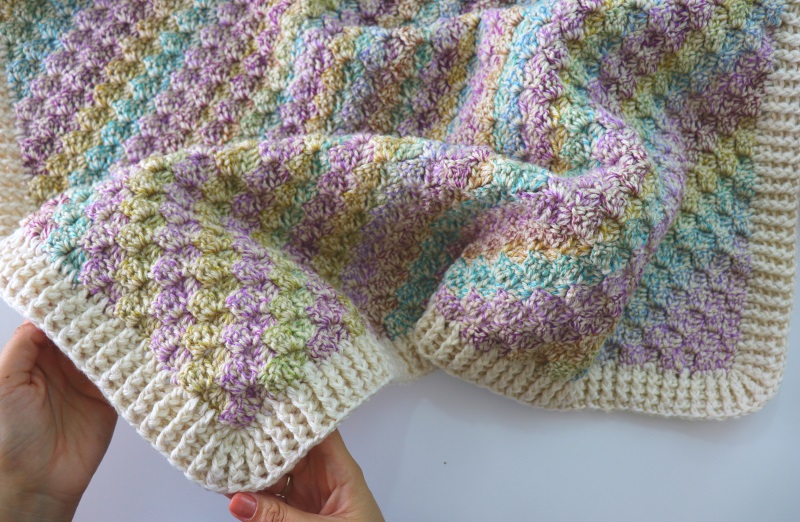
You are going to enjoy during creating this square corner to corner newborn baby blanket. It has a really quick work up with diagonal stripes. If you wish, you can make it bigger with more increases for yourself either. Remember, it’s a reversible one. After finishing the body, adding a border will make the blanket even more fabulous!
- You can purchase the ad-free PDF versions of my patterns on Etsy.
- You can print the PDF’s and use them anywhere you want. This way you can also support my works too.
MATERIALS
Yarn – medium, worsted-weight
- I Love This Yarn! Colors – 4002/Pasha (3 skeins)
- Yarn Bee Denim in Color – 001/Ivory (2 skeins)
Crochet Hook
- 5.5mm for the body
- 5mm for the border
Yarn Needle
Scissors
STITCHES & ABBREVIATIONS
Ch = Chain
St(s) = Stitch(es)
Sl St = Slip Stitch
DC = Double Crochet
FpDC = Front Post Double Crochet
BpDC = Back Post Double Crochet
sp = Space
NOTES:
*Finished Dimensions: 70×70 cm
*US crochet terms are used in this pattern.
*’DC 10′ means DC into the next 10 stitches.
*Total blocks are indicated in between < >.
ROW 1: Ch 6, DC in the 4th ch from hook and in the next 2 Ch. <1>
ROW 2: Ch 6, turn, DC in the 4th ch from hook and in the next 2 Ch, sl st into the Ch 3 sp of previous row, Ch 3, DC 3 in the Ch 3 sp from previous row. <2>
ROw 3: Ch 6, turn, DC into 4th ch from the hook and next 2 Ch, (sl st in Ch 3 sp of previous row, Ch 3, DC 3 into the that same Ch 3 sp) 2 times. <3>
ROW 4: Ch 6, turn, DC into 4th ch from the hook and next 2 Ch, (sl st in Ch 3 sp of previous row, Ch 3, DC 3 into the Ch 3 sp from previous row) 3 times. <4>
Every time we turn our work and begin with that chain six, we are increasing the number of blocks we have on our blanket by one. We are working diagonally on this blanket. That’s why it’s called corner to corner.
You continue with row 4 until you have reached the desired dimensions. In this blanket it’s 66 cm. Once we get to this number, we are then going to change the way we construct this blocks. So that way we change the direction of our blanket and we start decreasing the number of blocks by one for each row.
DECREASING ROW: Turn, sl st in each DC, sl st ch 3 sp of previous row. Ch3, DC 3 in the same sp, sl st into next ch 3 sp. Repeat this until the last block of the previous row. End up with a sl st in the ch 3 sp of last block of the previous row.
Repeat this decreasing row, until there’s only one block left. Fasten off.
BORDER
Since it’s a reversible one, you can work on any side of the blanket. The border will be reversible too as well.
Change your color and hook.
ROW 1: For this one,start working on where you’re finished (like you’ve never changed your color). Ch 3 and a DC in the same Ch 3 sp. DC 3 in the next 3 DC stitches. DC 2 in the next Ch 3 sp. Repeat this until the corner. When you get to the corner, insert your hook into the 1st Ch, DC 7. Complete all sides of the blanket. At the end of row 1, sl st into the first st of the row.
ROW 2: Ch 2, skip Ch 3 of previous row. *FpDC into the next st, BpDC into the next st.* Repeat this sequence all the way around. Sl st into the first st.
ROWS 3-4: Repeat ROW 2. Put a FpDC where you see a FpDC, a BpDC where you see a BpDC.
Fasten off. Weave in the end.
Now, your blanket is ready to warm your baby up!
Pattern created by Sirin’s Crochet
Written by Ece Bektas (@ecelibuculu)
Copyright: This pattern is copyrighted by Sirin’s Crochet and may not be copied, sold, distributed and claimed as yours. You are more than welcomed to share and sell your makes using this pattern. Please give credit to Sirin’s Crochet.
Please feel free to visit my Youtube channel at Sirin’s Crochet for more free video tutorials and don’t forget to subscribe to be notified for more free patterns.
- Video Tutorial :